Wednesday 1 July 2015

Oracle Order Management Setup Document in R12.2


Definition:
  • Oracle Order management is one of the most important part of the oracle EBS. The Order Management Application provides many flexible features enabling you to set up your system to begin processing different types of sales order.
  • In this document we are going to see the basic setups of Order management in Oracle EBS R12.
  • Few of the information that is required while setting up Oracle Order Management is shared through other modules like System Administrator for enabling profile options, Oracle Pricing Manager for Price List setup.
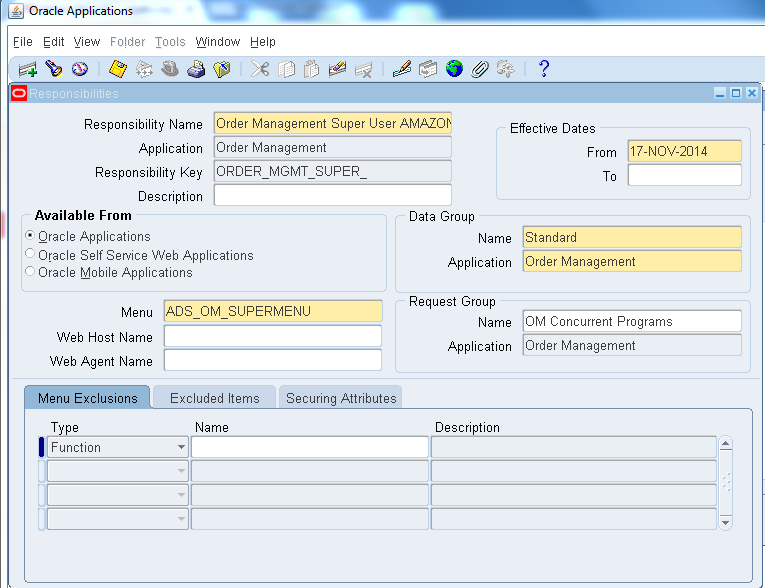
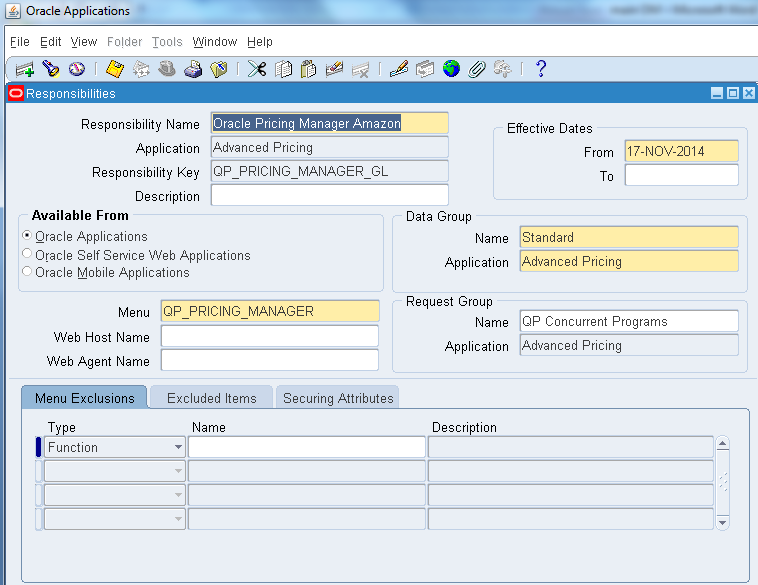
  • Firstly let’s add the Order Management  Super User Responsibility to the User

Invoking: System Administrator→Security→Responsibility→Define


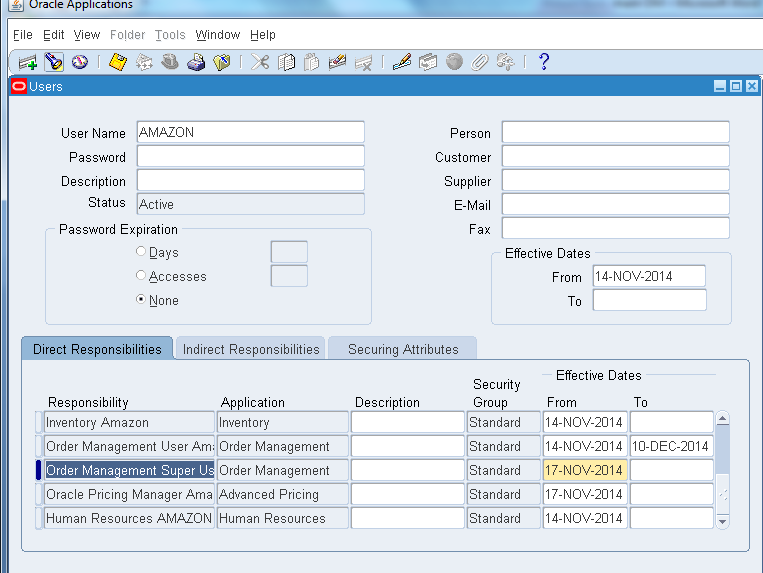
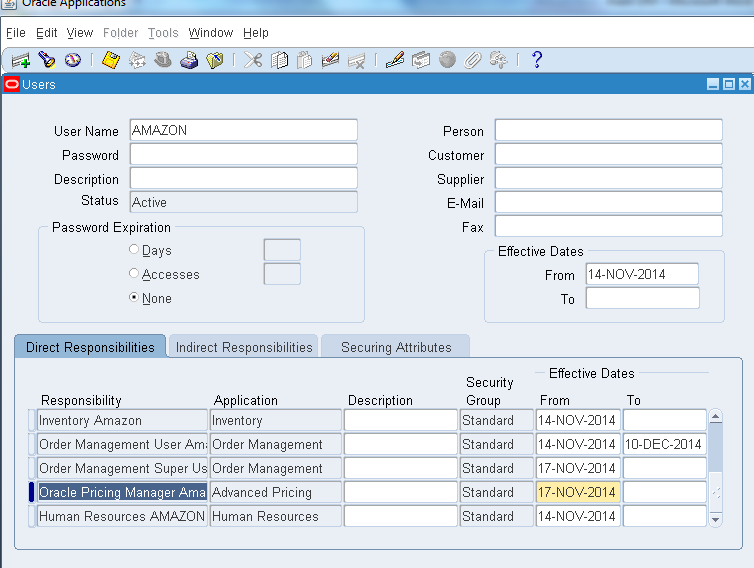
  • Now let’s add the responsibility to the user
Invoking : System Administrator→Security→User→Define


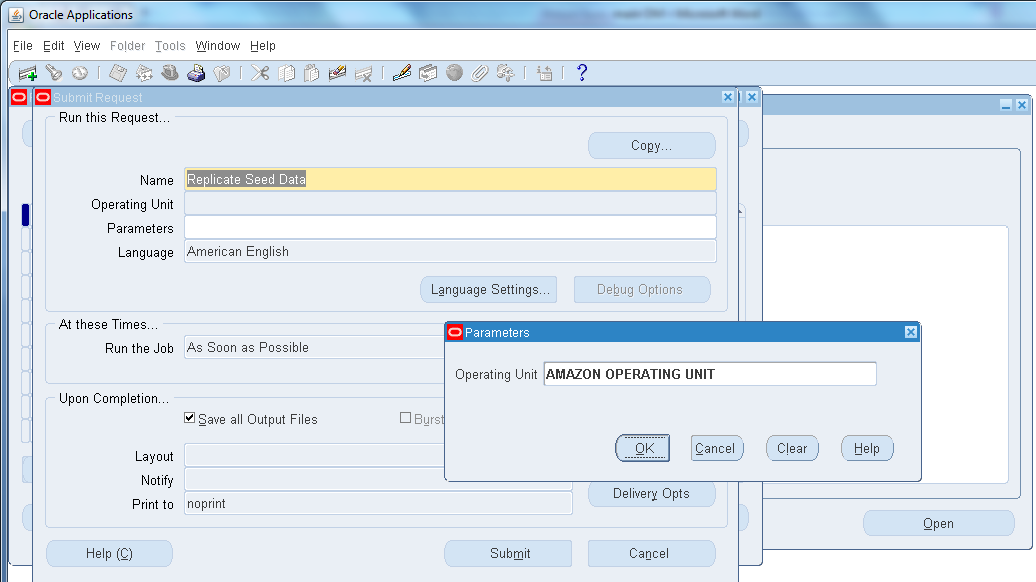
  • Run replicate seed data as below
Invoking: System Administrator→View→Request→Submit New Request

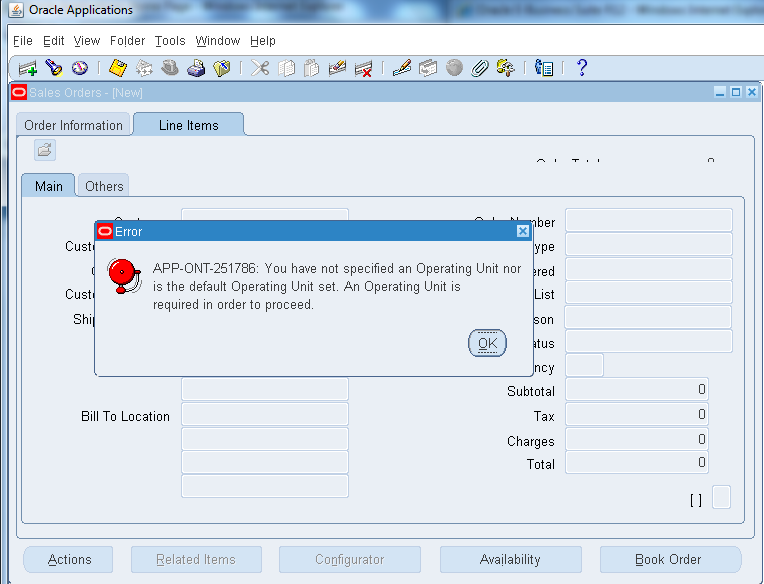
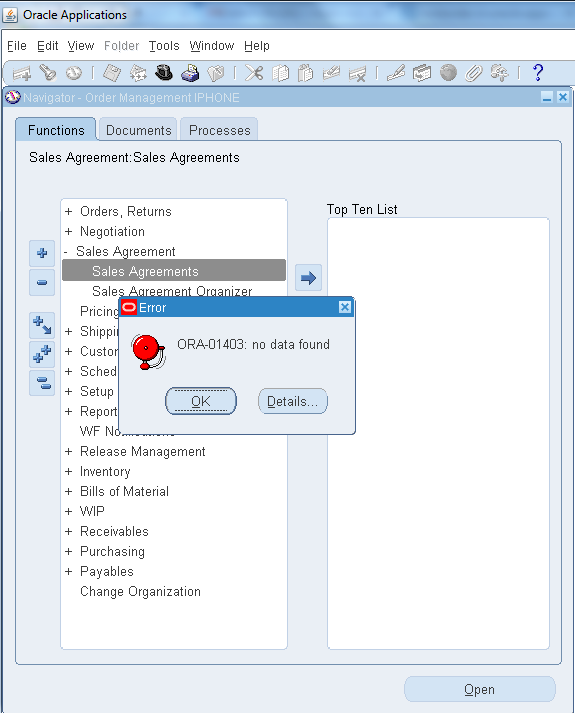
  • Now if switch the responsibility to order management and try to invoke Sales Order or Sales Agreement it won’t allow us to process, it will prompt an error as below.

Order Management→Orders, Returns→Sales Orders
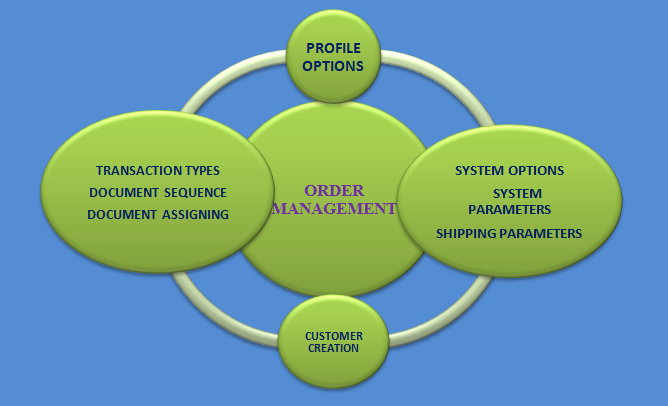
  • In order to enable these functionalities we have to follow mandatory setups as below.
Prerequisites:
  • Profile Options
  • System Options
  • System Parameters
  • Shipping Parameters
  • Transaction Types
  • Document Sequence / Assignment
  • Price List
  • Customers


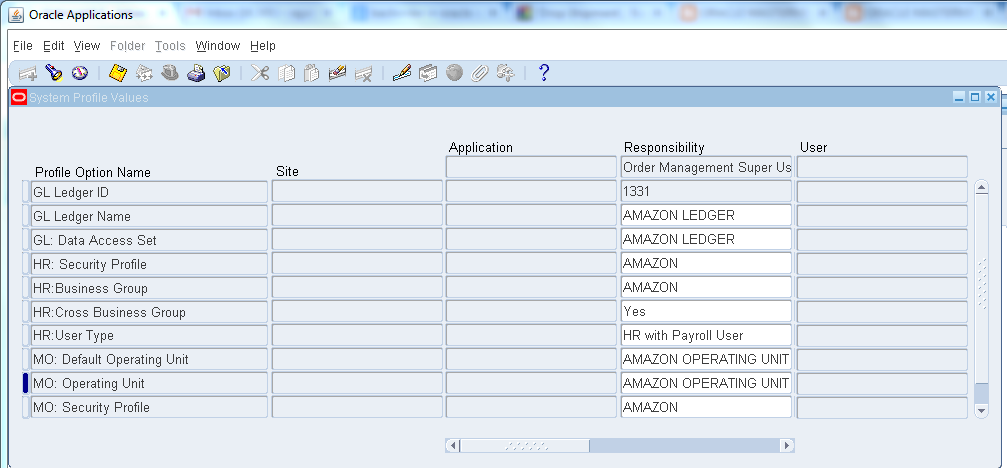
  • STEP 1: PROFILE OPTIONS

    • For any module profile options is a mandatory setup which has to be followed.
    Invoking: System Adminitrator→Profile→System

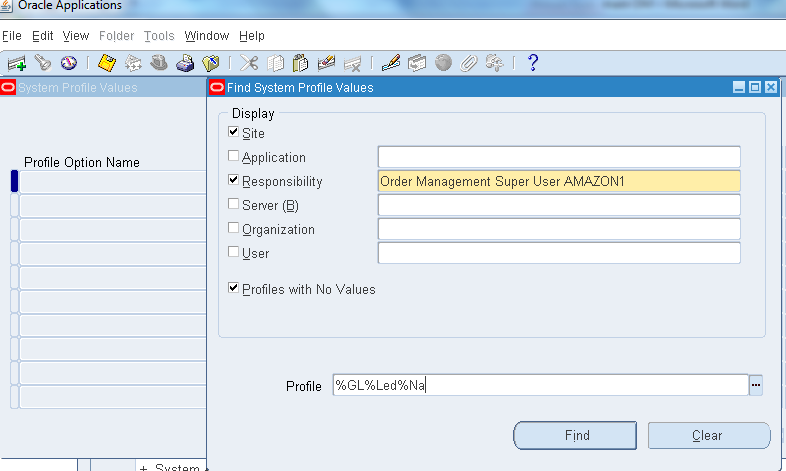
    In Profile field enter these features:
    • %GL%Led%NA%
    • %HR%User%, %HR%Sec%, %HR%Bus%
    • %MO%Oper%Unit%,  %MO%Defaul %, %MO%Sec%

    • So that the final output will appear as below.

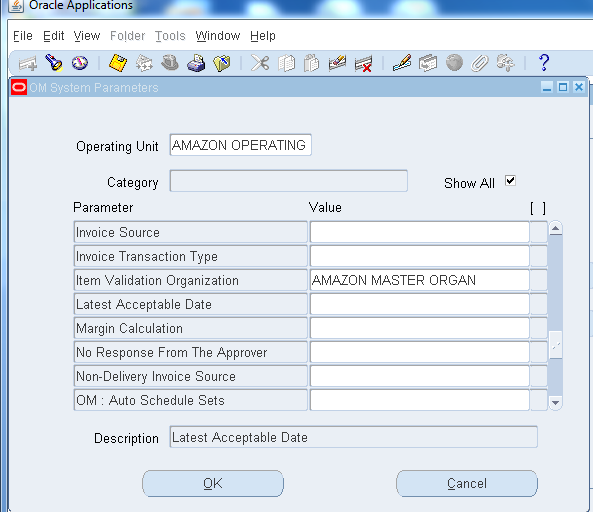
    STEP 2: SYSTEM PARAMETERS
    • We have to enable our Inventory in Item validation Organization
    Invoking: Order Management→Setup→Shipping Parameters→Define
    • Query for Item validation Organization and provide the inventory organization you prefer to connect and save the form.

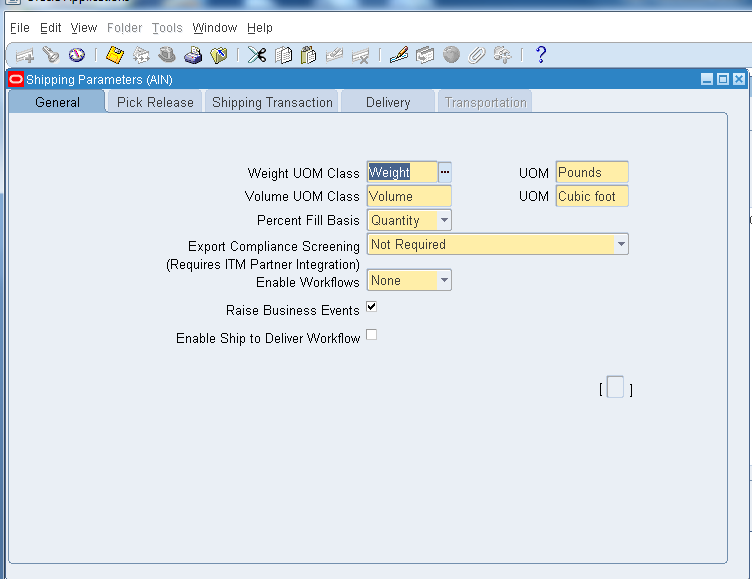
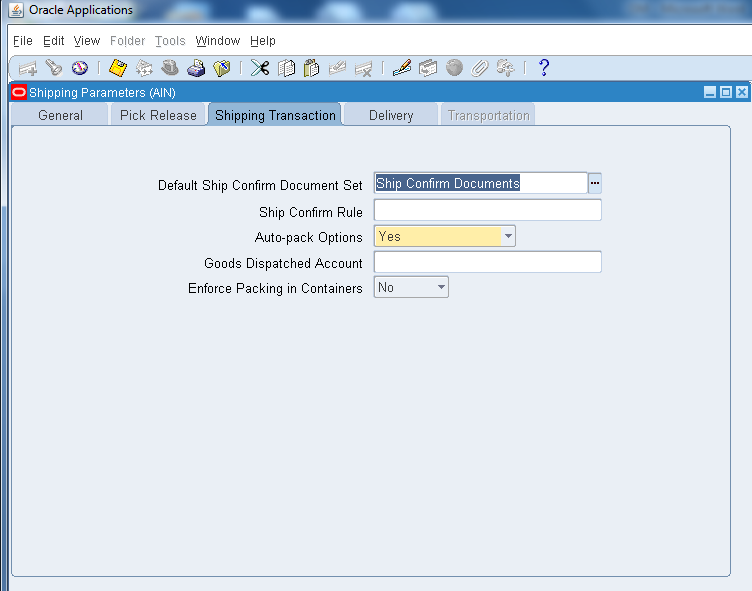
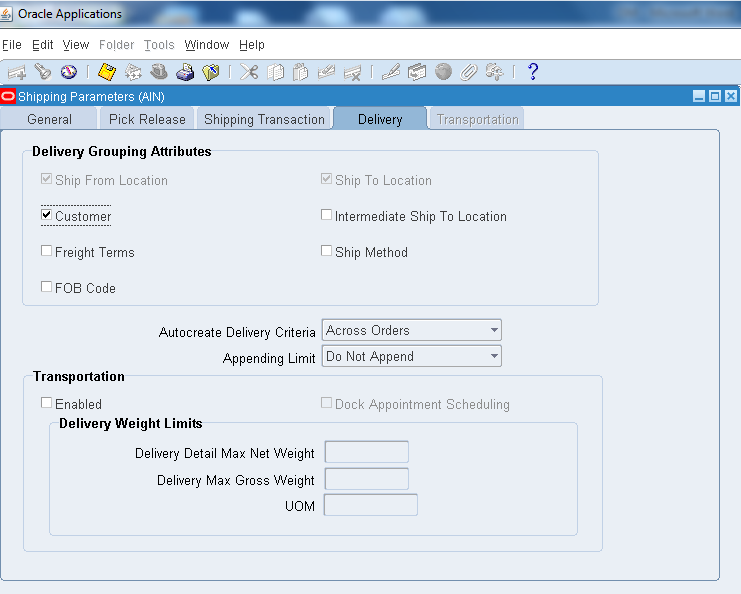
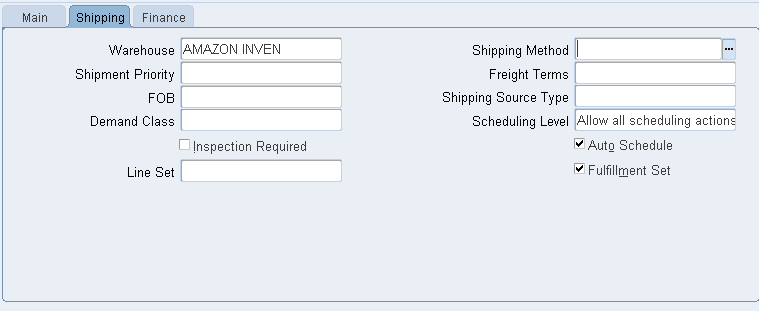
    STEP 3: SHIPPING PARAMETER
    Invoking: Order Management→Setup→Shipping→Shipping Parameters
    • Provide the details as below for corresponding tabs in Shipping Parameters
    • Here in below dialog box, the sub inventory is BANGLORE so that it will be the default staging for the goods.


    Auto create Deliveries
    • What happens if selected?
    Pick release automatically creates deliveries based on the delivery grouping rules and assigns delivery lines to them. When pick releasing, the Auto create Deliveries check box in the pick release form defaults to this parameter setting if you enter a warehouse. If you do not enter a warehouse, pick release uses this parameter setting from the organization of the warehouse on each sales order line.

    • What happens if Cleared?
    Pick release does not automatically create deliveries.

    Auto Allocate check boxes
    • What happens if Selected?
    Pick release creates move orders and automatically allocates them.

    • What happens if Cleared?
    Pick release creates move orders. You must manually allocate the order lines using the Inventory Transact Move Orders window.


    • Save and close the form above.

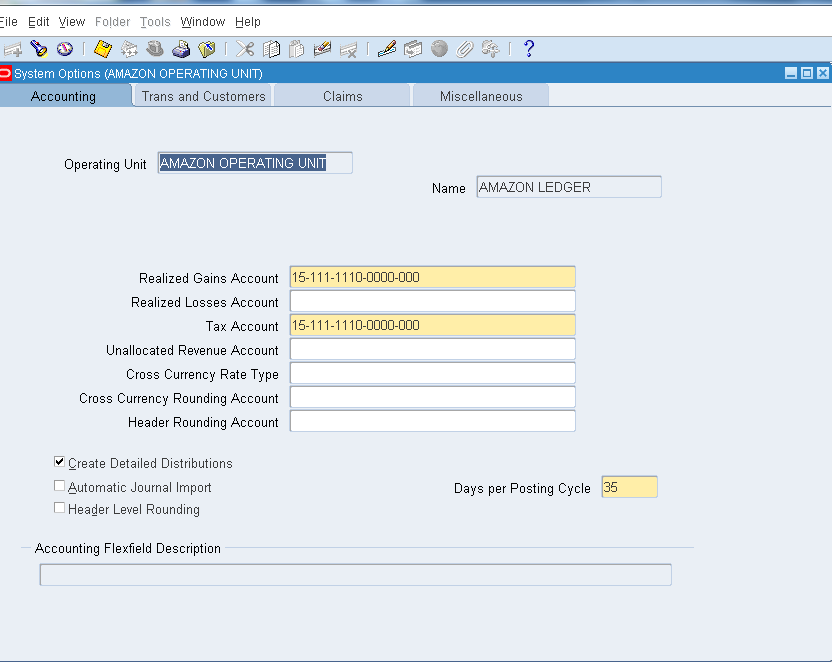
    STEP 4: SYSTEM OPTIONS
    • Here we are going to connect general Ledger and Operating Unit.
    Invoking: Order Management→Setup→Customers→System Options

    • If we have single operating unit it will show as default as below, if multiple please select any one of your choice.
    • In case the Operating Unit doesn’t show up, indicates that there is the problem with your multiorg.
    • Check completely the multiorg setups to solve it.
    • Provide the general ledger name in NAME field and account details in the account fields respectively.


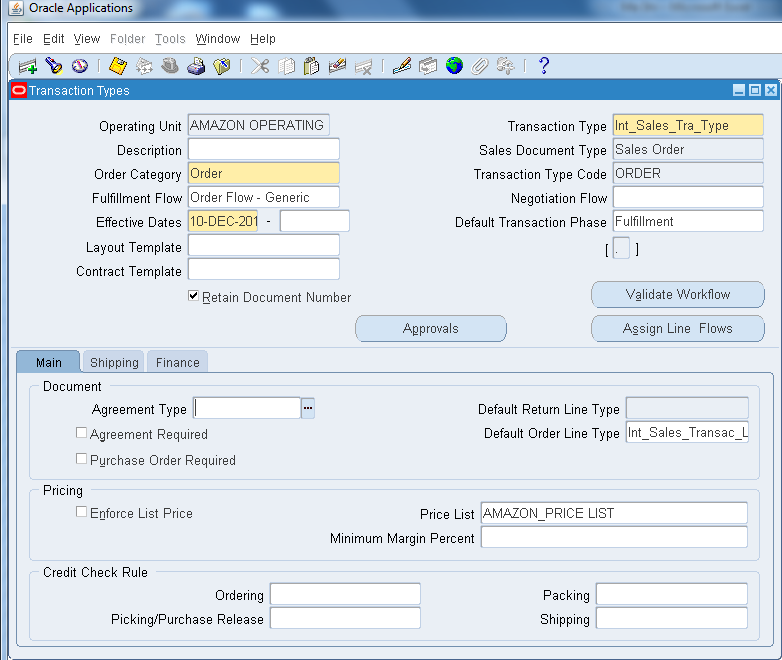
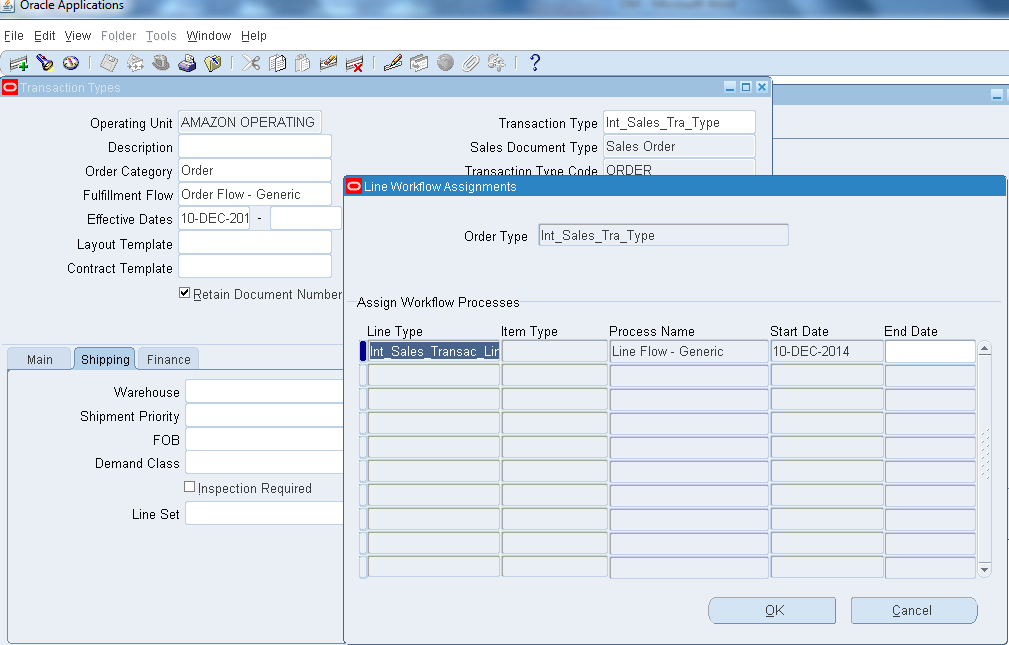
    STEP 5: TRANSACTION TYPES
    • Lets create a new Transaction type which are used to associate workflows for various phases of sales order processing.
    Invoking: Order Management→Setup→Transation Types→Define
    • Below dialog box appears.
    • Enter either Order or Return for the Order Category depending on whether your new line type is for sales lines or return lines.
    • The value Mixed is selected for order type which can contain both sales order and return lines.
    • Let’s create a Transaction Line as order for understanding.


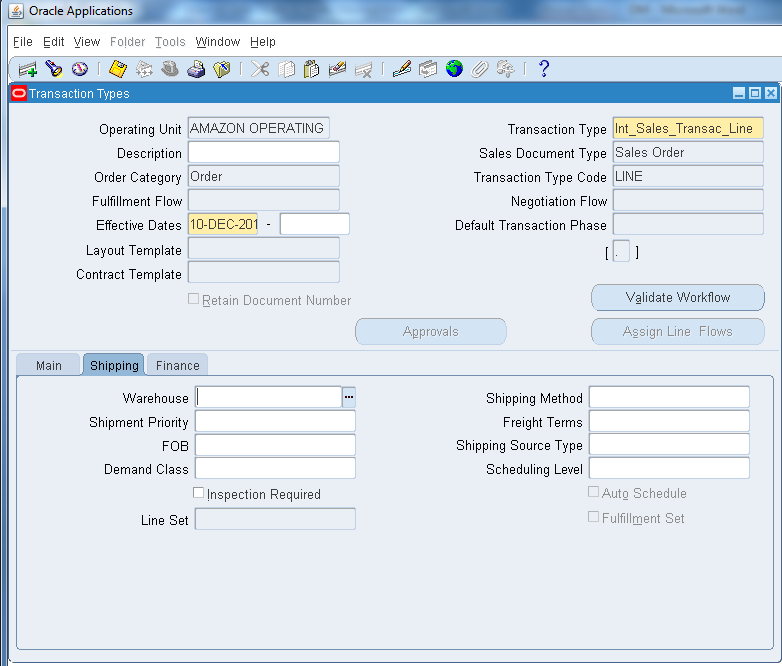
    And Transaction Type as below.
    • Order Category: Order
    • Sales Document Type: Sales Order
    • Transaction Type Code: ORDER
    • Fullfillment Flow: Order Flow – generic
    • Effective Date: Today
    • Default Transaction Phase : Fullfillment
    • In shipping tab mention the below details as well.
    • Click on assign line Flows
    • Line Type: Attach the Line created.
    • Process Names: Line Flow – Generic as below.
    • Click on Validate Workflows, a concurrent program runs on the background and save the dialog box.

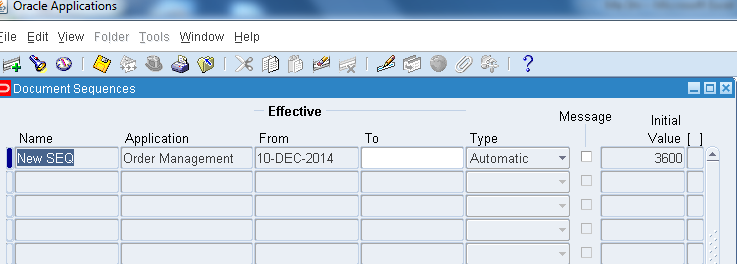
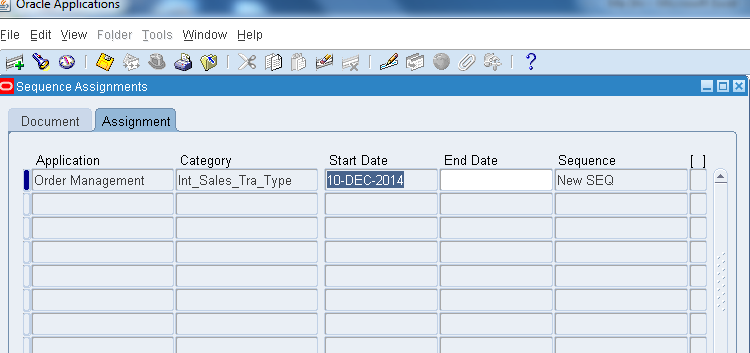
    STEP 6: DOCUMENT SEQUENCE & ASSAIGING
    • Let’s create a sequence for a document which will be followed for the sales order.
    Invoking: Order Management→Setup→Documents→Define
    Assigning:
    Invoking: Order Management→Setup→Documents→Assign
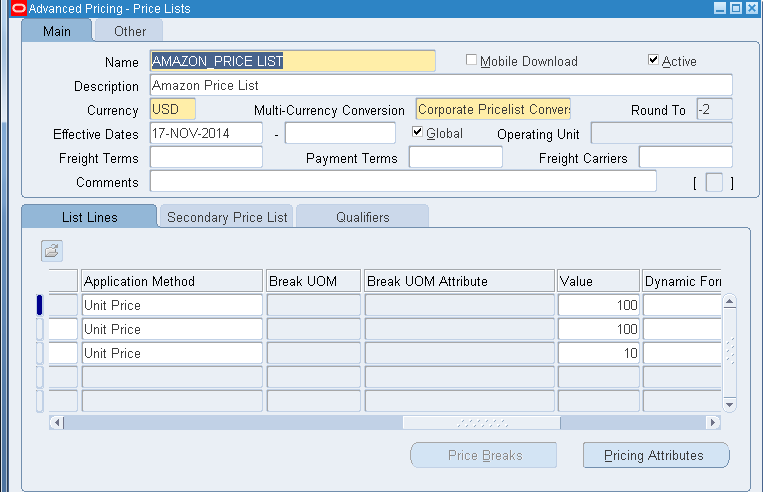
    • Mention the transaction type and sequence name we created.

    STEP 7: PRICE LIST
    • In oracle R12 in order to create a price list we have to add new responsibility called Oracle Pricing Manger, hence create a new responsibility from system administrator- security define and assign to the user as below.
    • Now switch the responsibility to Oracle Pricing Manager→Price List→Price List Setup
    • Make sure the below Profile Options before creating the Price List
    Profile Options:
    QP: Pricing Transaction Entity = Order Fulfillment
    QP: Source System Code = Oracle Pricing
    • Here the product attribute feature updates the priority depending upon the Item Category, Item Number, All Items etc., depending on which the price will be taken.


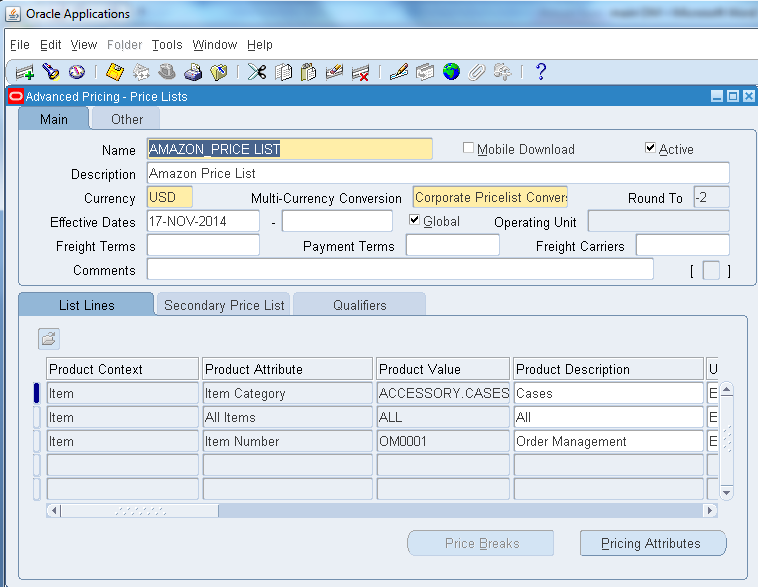
    Save and close the dialog box.

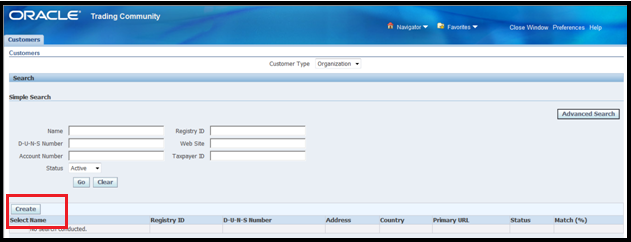
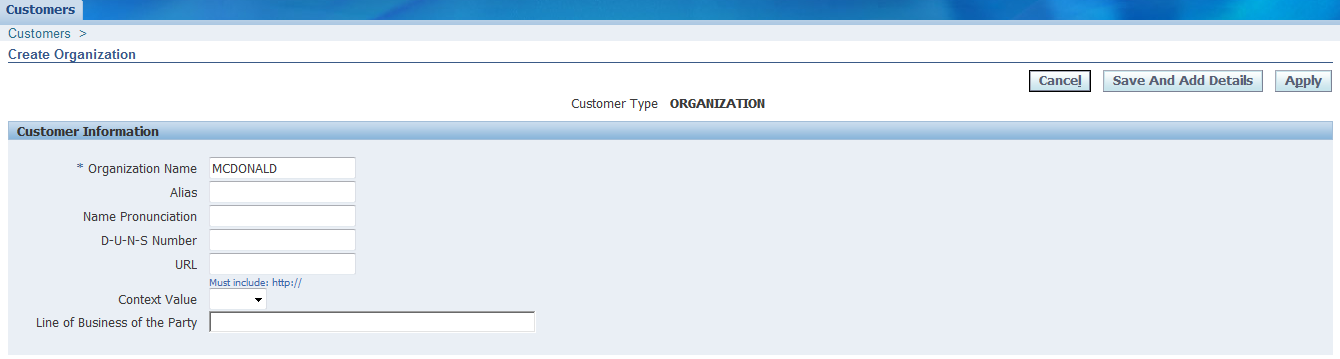
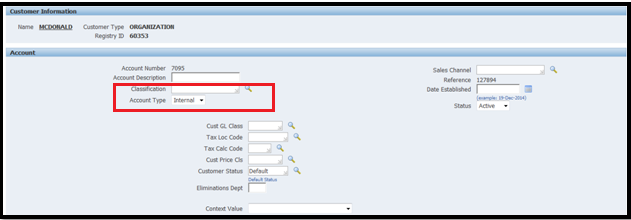
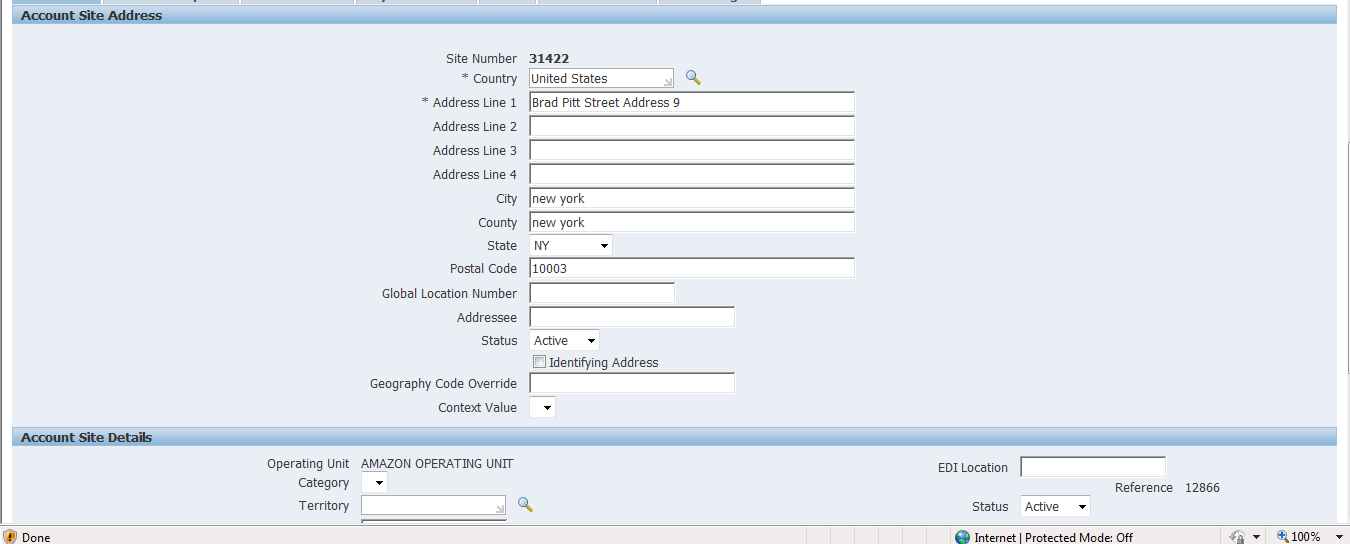
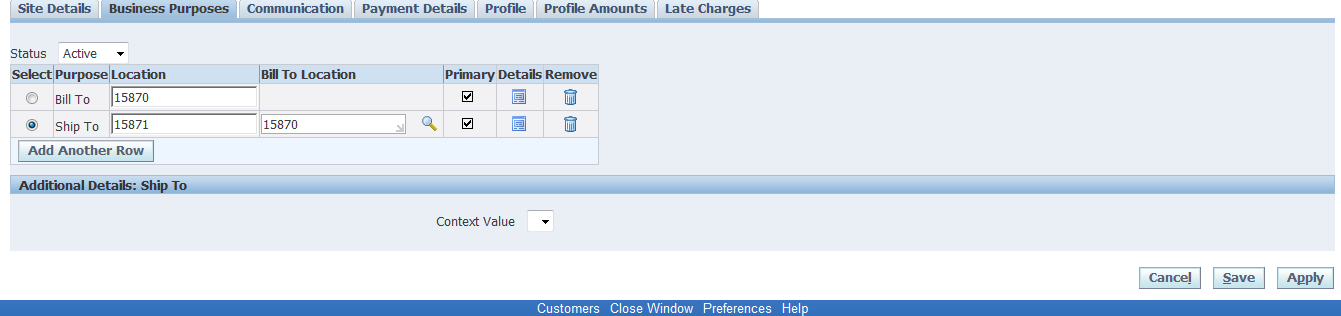
    STEP 8: Creating CUSTOMERS
    • Lets create a customer for our sales order
    Order Management→Customers→Standard
    • The below dialog box opens.
    • Click on the create button below.


    • Name any organization of your choice.
    • And account type as Internal.

    • Provide a valid address as below.


    • Save the box and add the same address or any other for your Ship to address as well.
    • Click on apply which completes customer creation.
    • Now we are all set to go, open the sales order
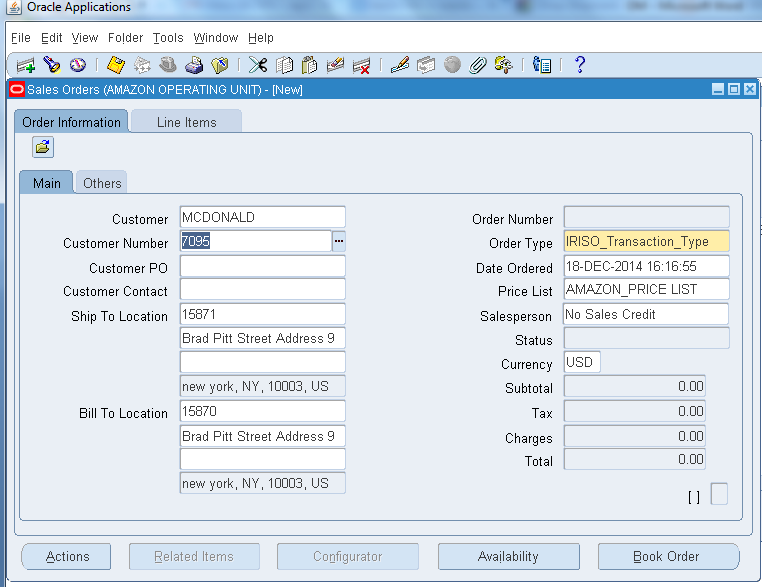
    Invoking: Order Management→Orders, Returns →Sales Order
    • The below screen will appear, from which you can book, release and ship confirm sales order.


    • The Oracle Order Management Application provides many flexible features enabling you to set up your system to begin processing order information.
    • This completes the setup procedure for Order Management

    1 comment:

    1. Thanks for sharing your valuable information.I found it very useful.Keep posting amazing content like this.

      Order management software

      ReplyDelete