
Definition:
- Internal Requisition/Internal Sales Order provide the mechanism for requesting and transferring material from one inventory organization to other inventory organization.
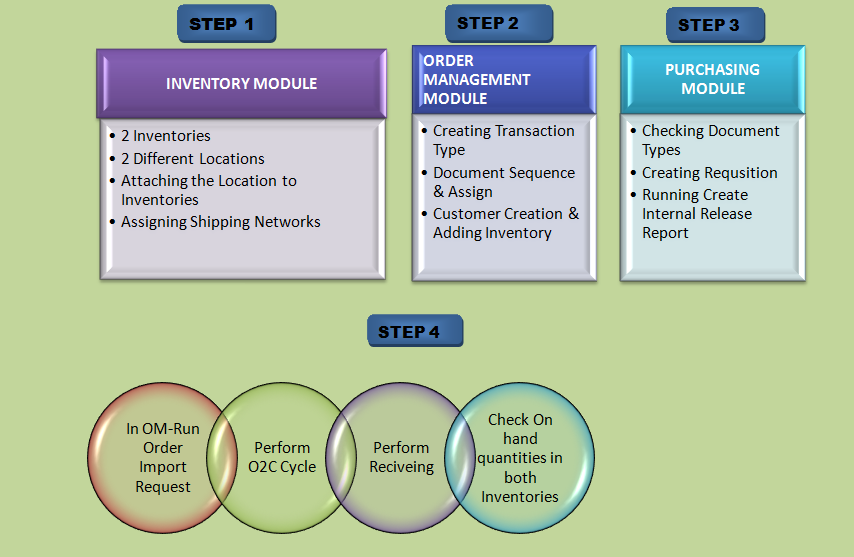
- Below is the process flow which has to be followed in each module in order to execute Internal Sales Order:
Mandatory Setups:
Inventory Setups:
- Create two different Locations
- Create two Inventory Organizations
- Link the Inventory Organizations into Internal Locations
- Create at least one Sub-inventory in each of the Inventory Organizations
- Define Shipping Networks
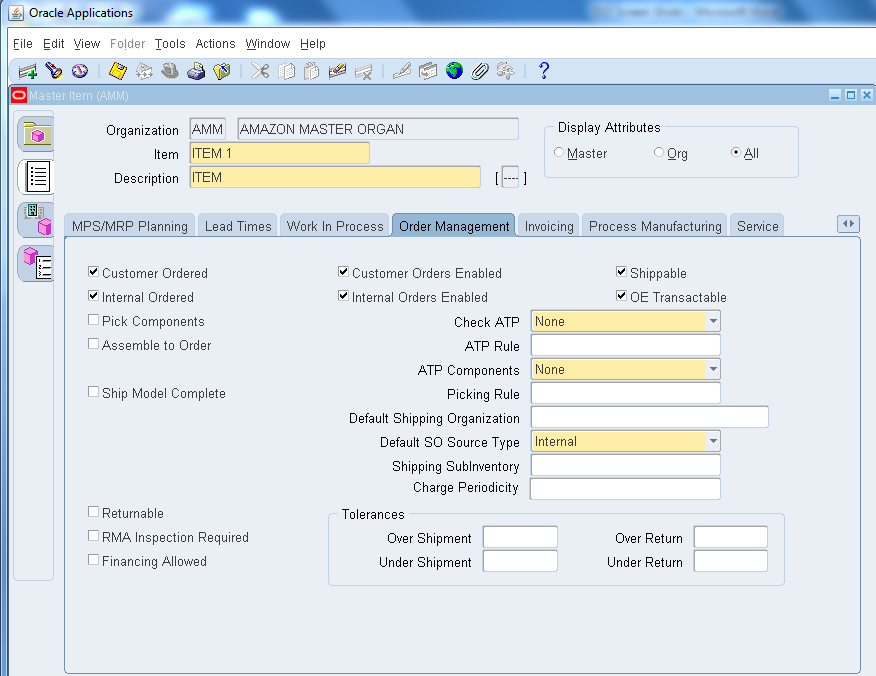
- Create Internal Item - Enable the Attributes "Internal Ordered" and "Internal Order Enabled"
Purchasing Setups:
- Attach the Internal Order Type in Purchasing Options
- Define Document Types for Internal Requisitions
- Define Approval Hierarchies for Internal Requisitions
- Define Approval Groups and Approval Assignments
- Define the Receiving Options for the Destination Organization
Order Management Setups:
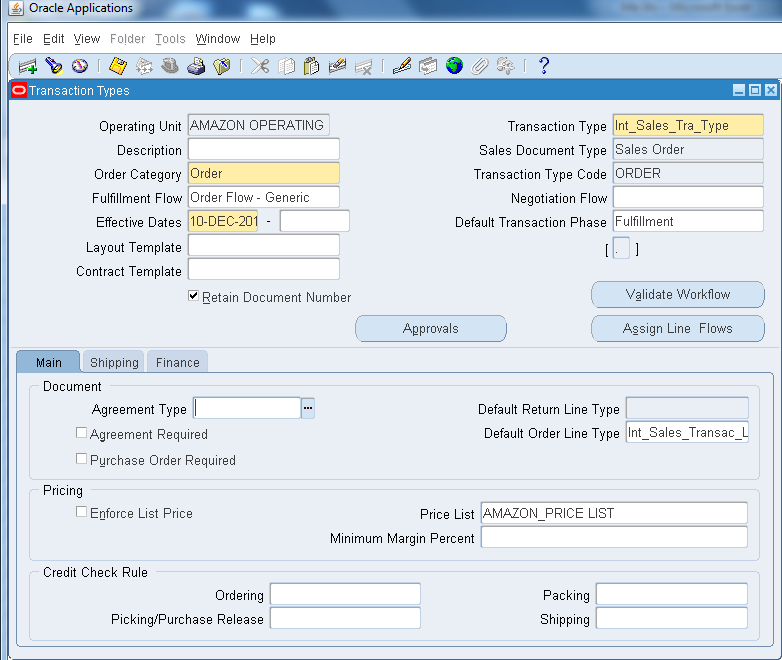
- Create Internal Transaction Type
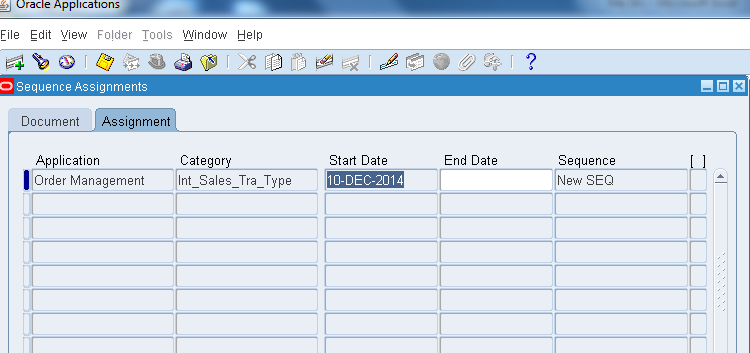
- Define the Document Sequence / Assignments
- Create Internal Customer
- Attach the Order Type, Internal Location and Organization into Customer Ship To site
- Define Shipping Parameters
Let’s see each step in detail,
STEP 1: INVENTORY MODULE
- Let’s create two Inventory Organizations and two different Locations first.
- (You can also perform copy org from previously created org by invoking Inventory → Setup → Organization → Organization Copy → Maintain Interface)
- Or create a new inventory from Inventory → Setup → Organization → Organization
- Here we have created 2 Inventory Organizations
- First Inventory Org Name : FIRST INVENTORY Sub-Inventory Name: Good Down
- Second Inventory Org Name : SECOND INVENTORY Sub-Inventory Name: Store Room
- If you are creating new inventory organization then make sure you are providing all the details in Receiving Information, Inventory information, Accounting Information and Shipping Networks. If you copy the Inventory Organization from an existing Organization then system will copy all these details automatically as like as the model organization.
- Open the Periods in Inventory, Purchasing, and General Ledger for the current month.

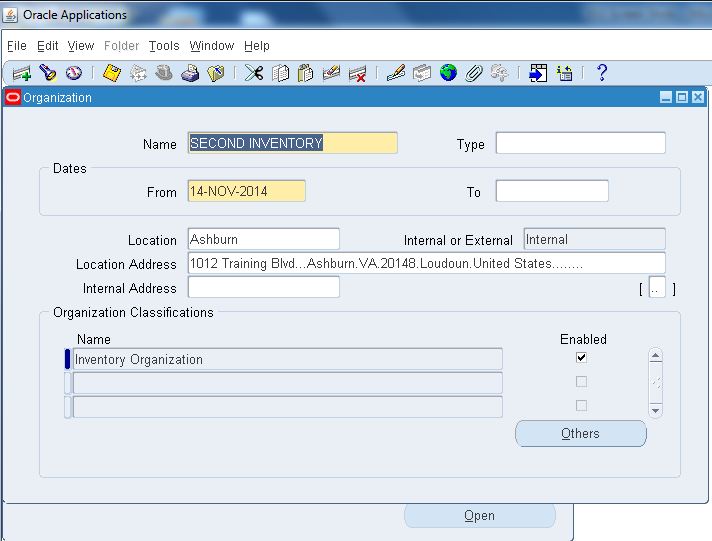
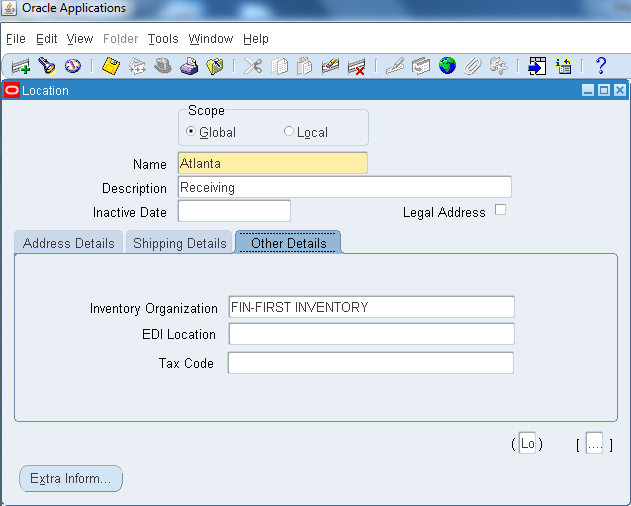
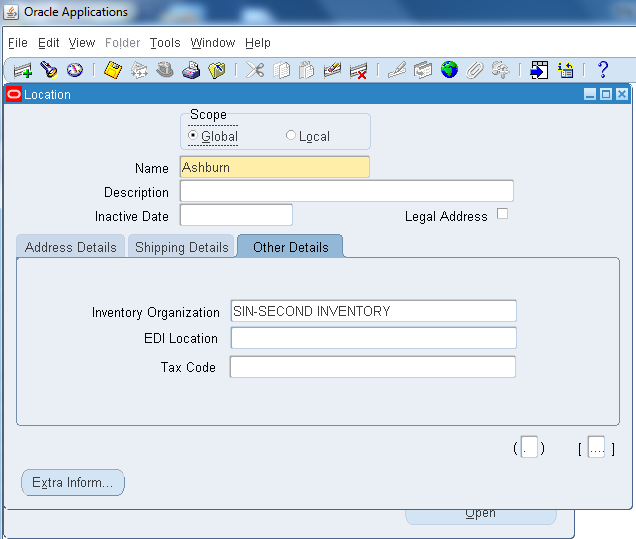
- Now let’s add the inventory to the location created by clicking on other details as below.
Invoking: Inventory → Setup → Organization → Location
Item Creation
Invoking: Inventory → Items → Master Items
- Name: ITEM 1
- Unit Price: $15
- Purchasing template applied
- Internal Ordered Check box enabled in Order Management.
- Assigned to all inventory
Shipping Networks
Inventory → Setup → Organization → Shipping Networks
- Now let’s input the Source and Destination Inventories to transfer the items.
Prerequisites:
- From & To inventories to be mentioned
- Internal Order Required Checked
- Primary Accounts number

- Save and exit the dialog box, now switch to Order Management Responsibility.
STEP 2: ORDER MANAGEMENT MODULE
- Here let’s create a separate transaction type
- Invoking: Order Management → Setup → Transaction Type → Define
- Sales Document Type: Sales Order
- Fulfillment Flow: Order Flow generic
- Here I have attached Line Type from the one I previously created and assigned (Int_Sales_Transac_Line).
- Validate the Workflow
Document Sequence & Assign
- Let’s create a new document sequence by Invoking: Order Management → Setup → Documents →Define

- Here Sequence name is New SEQ and Sales Order # will be generated starting from 3600.
- And assign the sequence by selecting Order Management → Setup → Documents →Assign
CUSTOMER Creation
- Create a new Customer by selecting Order Management → Customers → Standard
- I have created a new customer as PAYPAL below by filling up the Legal Address.
- Make sure you create the customer type as Internal not External
- Query again the customer and follow the below steps.
Click on details from below.

Click on details again,
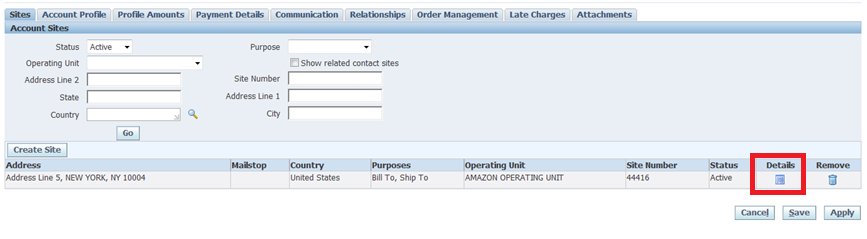
- Select Business Purpose tab
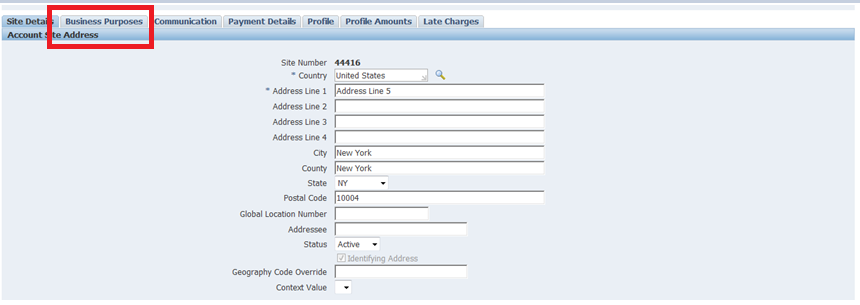
- Click on details which indicate both Ship to & Bill to Option you created before.
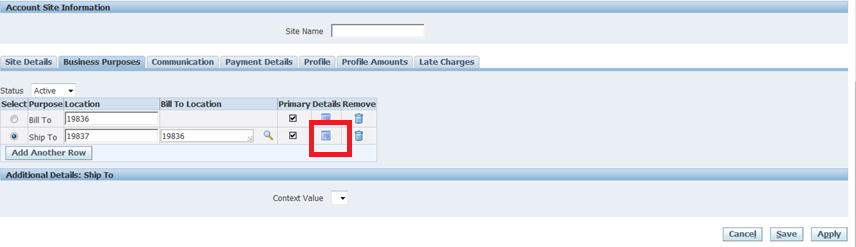
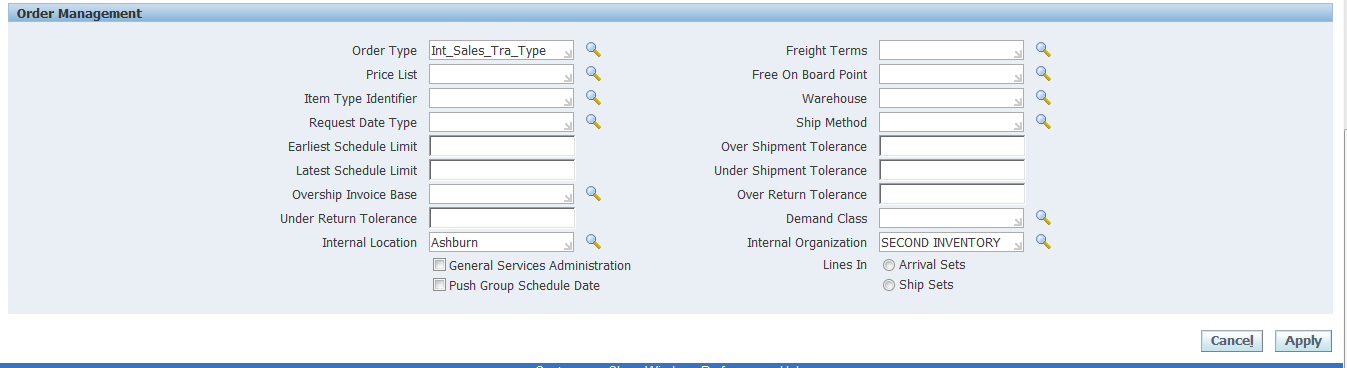
- Now under here in order type select the transaction type you created and fill in the Internal Location and Internal Organization respectively as below.
- Save the page and switch the responsibility to Purchasing.
STEP 3: PURCHASING MODULE
Document Types:
- Before proceeding further let’s make sure the document type is perfect.
- Invoking: Purchasing → Setup → Purchasing →Document Types
- Select the line Requisition Internal

And enter the below information correspondingly.
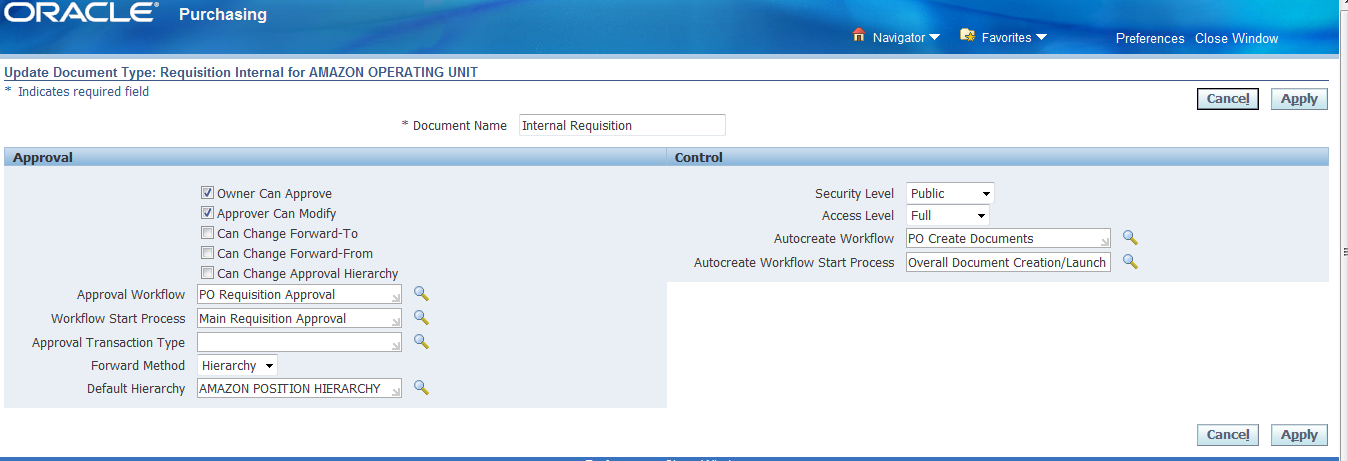
- The default Hierarchy is the one which you created before for purchasing setup.
Creating Requisition:
- Let’s create a REQ, Invoking: Purchasing → Requisition → Requisitions
- Enter the item which we created before
- ITEM 1
- Quantity # 6
- Fill up the Source and Destination inventory as below.
- Req # generated 4019

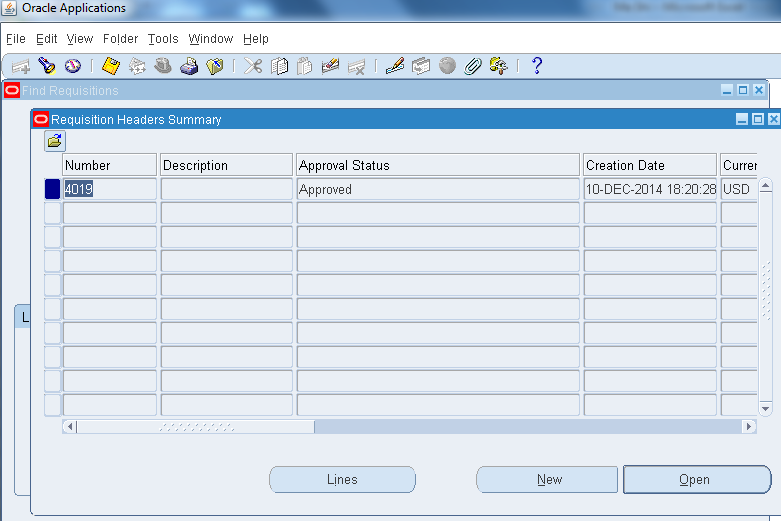
- Approve the Requisition and query the REQ in Requisition Summary as above, after making sure the REQ has been approved run the report
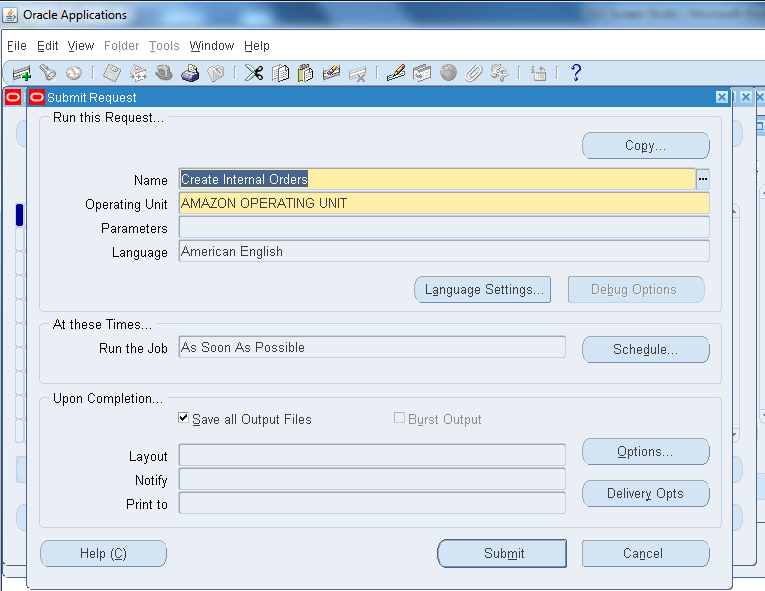
Create Internal Orders from View → Request → Submit a New Request → Create Internal Orders.
STEP 4: Order Import & Perform O2C Cycle
Now let’s switch the responsibility to Order Management and perform Order Import
Invoking: Order Management →Orders, Returns → Import Orders → Order Import Request
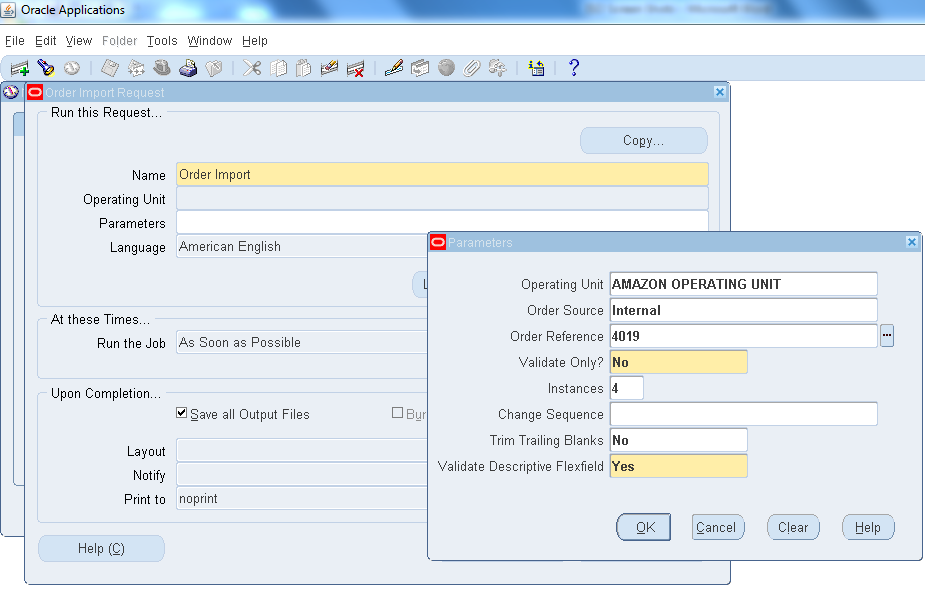
- Select the respective Operating Unit
- Order Source as Internal
- Order Reference # 4019 (Req created before)
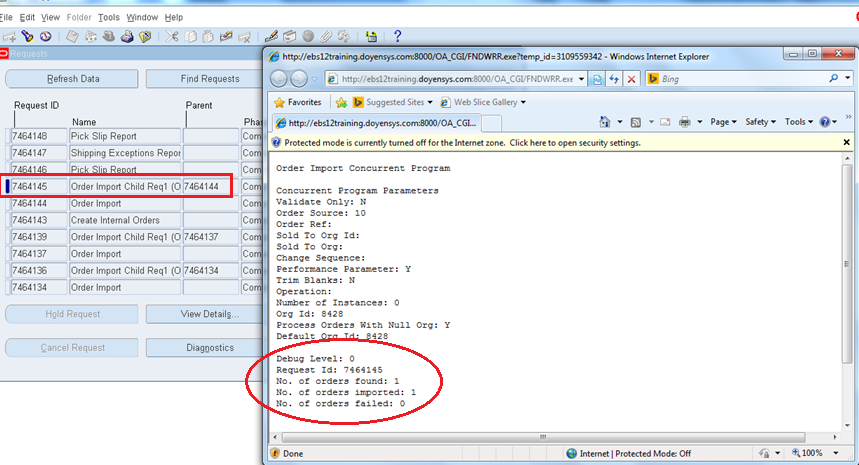
- This process will run two concurrent programs and we have to make sure if the program "Order Import Child Req 1" is completed successfully by viewing the output.
- Here No of orders found is 1, Imported 1, Failed 0
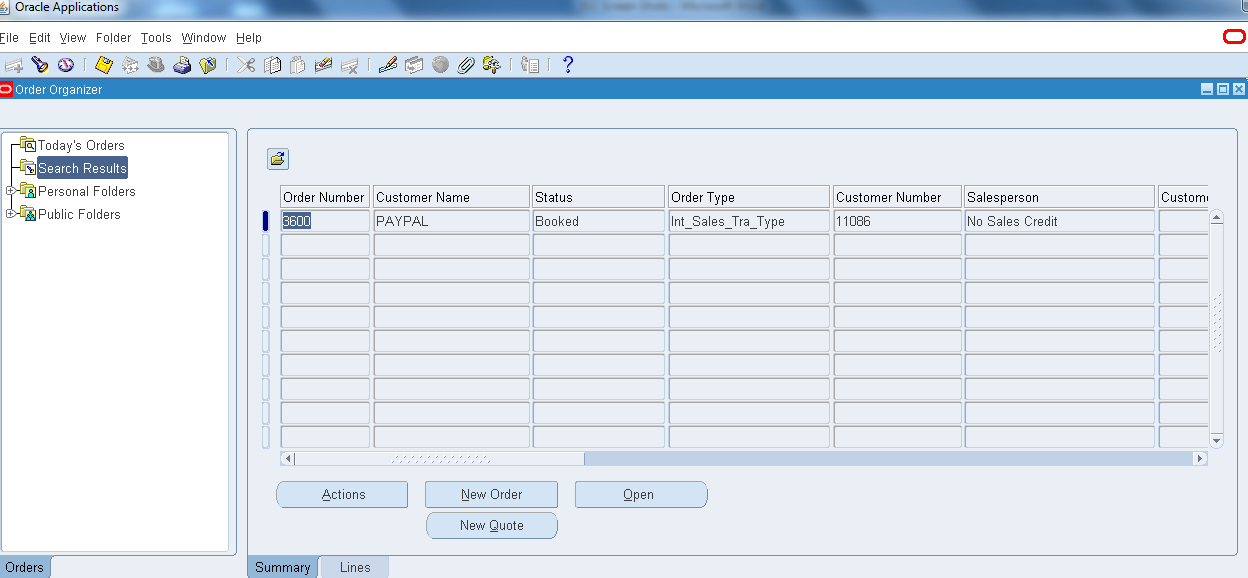
- Now query the Internal Sales Order number in Order organizer with Order Source as Internal and Order Source Reference as "Internal Requisition Number" from Orders, Returns > Order Organizer as below.
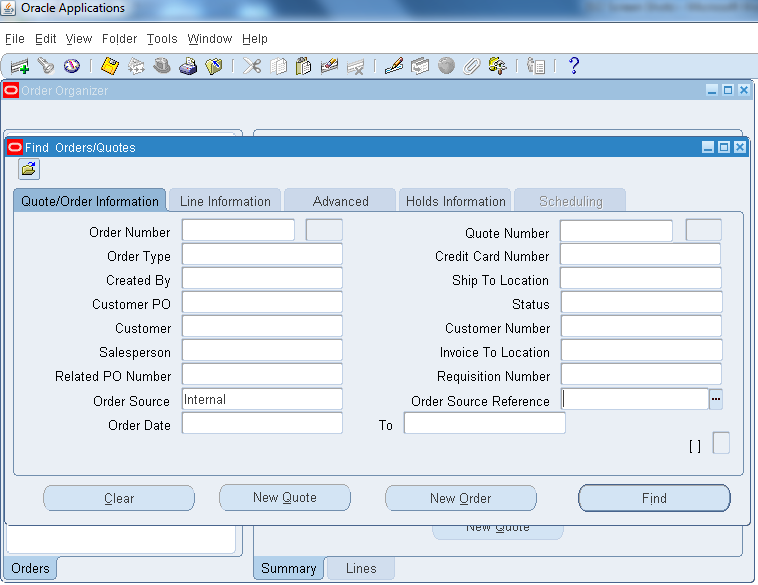
- Below the order number is generated with sequence 3600, as we updated while Document Sequencing.
- In case, if error emerges and unable to pull the order number through order organizer do correction by
- Invoking: Order Management →Orders, Returns → Import Orders → Correction
- Mention the request ID from which the program ran and select find, the dialog box will prompt the error and follow the instruction for solution.

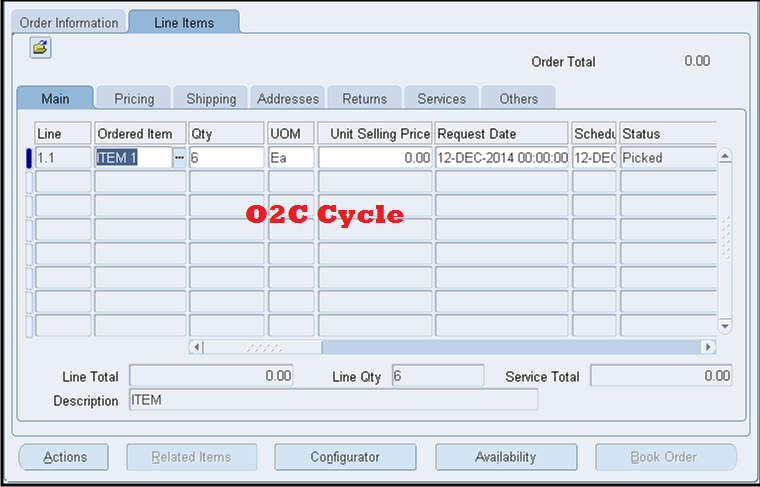
- Now query the order number in sales order and perform O2C cycle.
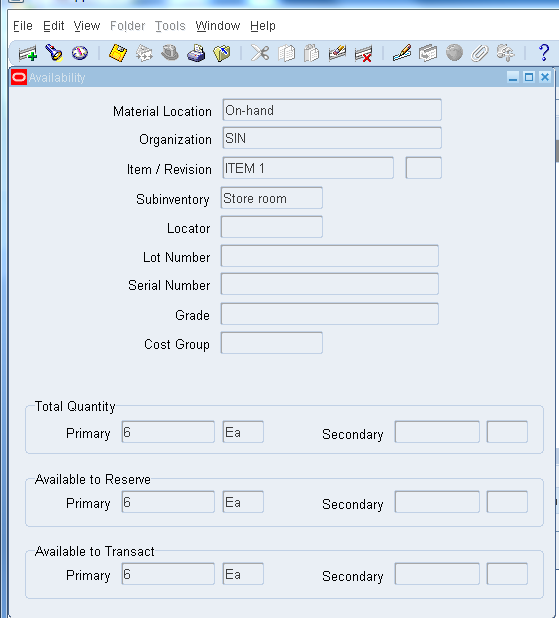
- Now if you check the On hand quantity for the First Inventory it will be displayed as below.

- After performing receiving in Purchasing or Inventory responsibility, if you check the On hand quantity in SECOND INVENTORY it will be displayed as below.
Conclusion:
- Hence the item from the First Inventory has been transferred to the Second Inventory respectively.
- The other method of transferring is use of "Inter Organization Transfer" Feature & the reason why we are using this is,
- IR and ISO provide us with a way to transfer material where we can introduce an approval mechanism for ordering material, and also track the transaction through documents. These features are not available in the Inter Organization Transfer utility.
I want to change ISO status from submitted to Enetered
ReplyDelete