Showing posts with label OBIEE. Show all posts

Tuesday, 11 July 2017

Creating Oracle BI Publisher Report using Template Builder

Template Builder is an add-in to Microsoft Word that simplifies the development of RTF templates for creating Reports.
In this example we will create a template for an Invoice which will be used to create an Invoice Report in BI.
  1. Create a New Data Model .
  2. In This example , the following SQL Query is used and the Data is generated.
/* Formatted on 7/11/2017 10:15:32 AM (QP5 v5.114.809.3010) */
  SELECT   C.PARTY_NAME,
           C.ADDRESS1,
           C.CITY,
           C.STATE,
           O.NAME,
           O.OPTY_ID,
           O.EFFECTIVE_DATE,
           R.QTY,
           R.UNIT_PRICE,
           R.REVN_AMT,
           R.COST_AMT,
           R.EXPECT_AMT,
           P.INTERNAL_NAME
    FROM   HZ_PARTIES C,
           MOO_OPTY O,
           MOO_REVN R,
           QSC_PROD_GROUPS_B P
   WHERE       (C.PARTY_TYPE = 'ORGANIZATION')
           AND (O.NAME = 'New Invoice')
           AND (O.CUST_PARTY_ID = C.PARTY_ID)
           AND (O.OPTY_ID = R.OPTY_ID)
           AND (R.PROD_GROUP_ID = P.PROD_GROUP_ID)
ORDER BY   O.LAST_UPDATE_DATE DESC


Note: (Create Sample Data by selecting the option Save As Sample Data)
  1. Then, we shall create a RTF Template using Microsoft Word Template Builder.
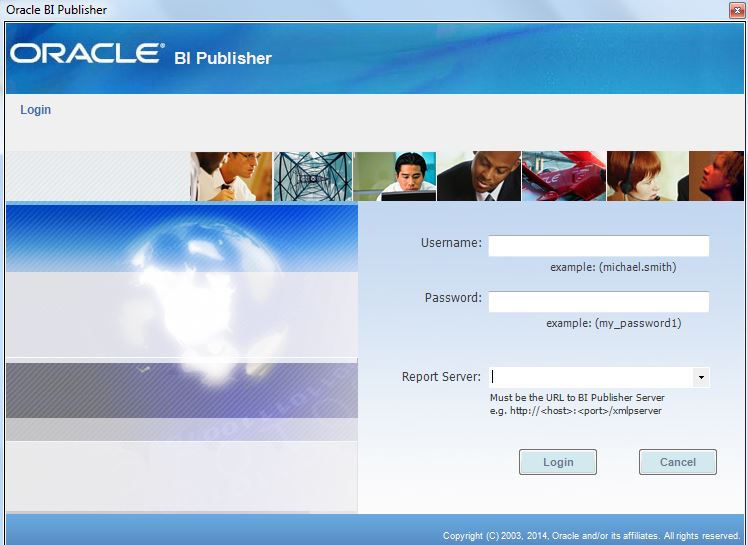
Log in to the BI Publisher from Microsoft Word by giving in the credentials and the Report server URL


  1.  Select the Data Model from the Catalog and Click on Create Report.
   

5.After the report is created the template can be designed by adding fields, Tables or forms. The functionalities of Word can be used to enhance the template design.


6.Save the template as RTF file and on the BI, and create a New Report. In this Case we are using the Data Model that was created earlier to build the Report.


Select the option Use Report Editor and click next.

7.Select the Layout for the Report. Here we choose to upload a RTF Template


8.Give a suitable Name for the layout and browse the template file and click Upload.


9. After the layout is uploaded, Click on view Report.


10.The Report will be generated according on the template that we had created.


The report can also be downloaded in PDF, RTF or any other format.

Tuesday, 1 July 2014

How to create Users and Groups in OBIEE11g

Steps to Create a User and Group:
If you want to create a new User and assign that User to a new Group that you have created, do the following:
  1. Launch Weblogic Administration Console eg: http:<hostname>:<port_no>/console
  2. Create a new User in security Realm.
  3. Create a new Group in security Realm.
  4. Add User to new Group.
  5. Launch Fusion Middleware EM console (http:<hostname>:<port_no>/em)and create a new Application Role and assign it to the new Group.
  6. Edit the repository (RPD file) and set up the privileges for the new Application.
2. Create a new User in security Realm:
Login Weblogic admin console and on Left side panel click on Security Realm1 . And click on myrealm2 in Right side panel.


Click on Users and Groups Tab and below select Users tab again and then click New as shown in below screen shot.

Create user by providing all details and click ok.

3. Create a new Group in security Realm:
Login Weblogic admin console and on Left side panel click on Security Realm1 . And click on myrealm2 in Right side panel.


Click on Users and Groups Tab and below select Groups tab again and then click New as shown in below screen shot.


Create a Group by providing all details and click ok.

4. Add User to new Group.
Click on Security ream->myrealm.
And then click on Users and Groups and Users tab. In that click on new user (here User1 )

In Next window click on Groups. In Available Groups select created group and Move to chosen window as shown below.


5. Launch Fusion Middleware EM console (http:<hostname>:<port_no>/em)and create a new Application Role and assign it to the new Group:

Assign Group to Application Role:


Important:  Stop OPMN and Start again

6. Edit the online repository (RPD file) and set up the privileges for the new Application:
Click on Manage->Identity


Click on BI Repository and on Right window clicking on Application Roles - Now you can see roles created in EM Console.

HOW TO ADD APPLICATION POLICY TO APPLICATION ROLE

I have created a Application role Webcat Admnistrators . I want to grant rpd access to this role.
Follow the below mentioned steps:

Step 1 :


Step 2 :


Step 3 : 


Step 4 :

 Select the permission 
 resourceType=oracle.bi.server.permission,resourceName=oracle.bi.server.manageRepositories


This will grant rpd access to this role.

Check whether the permission has been added.


Now if we grant the role WebcatAdministrators to a group, the user included in that group will be able to login to the rpd.