Bank
1. Navigate to Payables Manager->Setup->Payment->Banks and Bank Branches.Click on Banks tab and then click on Create button.(Can also use Cash Management Responsibility->Setup–>Banks–>Banks navigation)

2. Select the country, enter Bank name & number and other Bank details.Then click on “Save and Next” button.

3. Click on “Create” button under Address tab if you want to add address details.Then click on “Save and Next” button.
4. Click on “Create Contact” button. Enter the details and click on “Apply” button.

5. Click on “Finish” button and the Bank is created.

Branch
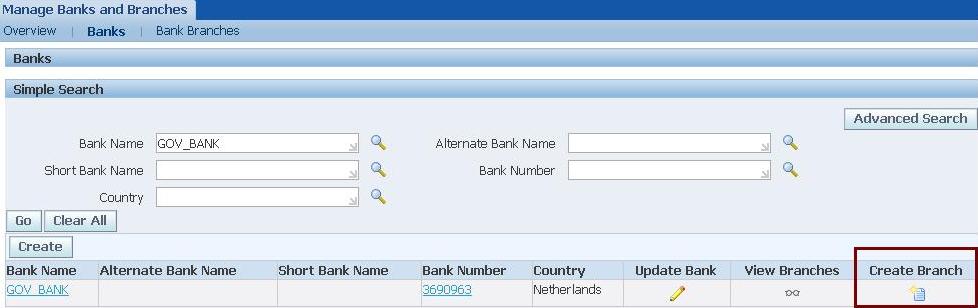
1. Search the newly created bank from
Payables Manager->Setup->Payment->Banks and Bank Branches and
then click “Create Branch”.
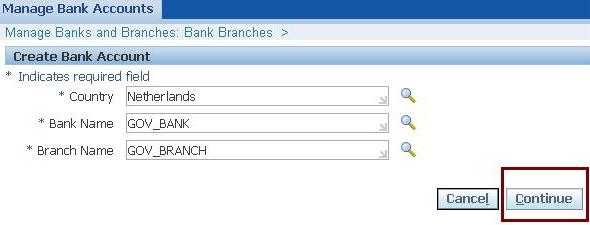
2. Click on continue button and enter the Branch name,Branch number and select Branch type.Then click on “Save and Next” button.Branch Types are:
- ABA: American Bankers Association
- CHIPS: Clearing House Interbank Payment System
- SWIFT: Society for Worldwide Interbank Financial Telecommunication
- OTHERS


3. Click on “Create” button under Address tab if you want to add branch address details.Then click on “Save and Next” button.
4. Click on “Create Contact” button. Enter the details and click on “Apply” button.


Account
1. Search the newly created Branch under Bank Branches tab and then click on “Create Account”.

2. Click on continue button and enter the Bank Account Owner.Also select the “Account Use” . Then click on Next button.

3. Enter the account Name and other account information’s.Then click on “Save and Next” button.

4. Enter the Account Control informations and click on “Save and Next” button.
- Multiple Currency Payments: Enable this option if you want to use this bank account to pay invoices entered in multiple currencies. You can select this option only if the Use Multiple Currencies Payables option is enabled and of the bank account is in your functional currency.
- Allow Zero Payments: Enable this option to allow zero-amount payments from this bank account.
- Pooled Account: Enable this option if you use Automatic Offsets and you want to associate multiple companies with this bank account. Oracle Payables creates one corresponding cash accounting entry for each liability distribution. Oracle Payables builds the cash account based on the cash account defined for the bank account, and on the account segments of the liability lines.
- Maximum Outlay: Enter the largest currency outlay that you allow for a payment batch for this bank account. The system displays a warning if the payment batch exceeds this amount. However, you can continue to process the payment batch. You can override this default amount when initiating a payment batch.
- Minimum Payment: Enter the lowest payment amount that you allow in a payment batch. You can override this default amount when initiating a payment batch. Maximum Payment. Enter the largest payment amount that you allow in a payment batch. You can override this default amount when initiating a payment batch.

5. Click on “Add Organization Access button” and enter the Organization and select Account Use options.Then click on Continue button.


5. Enter the Payables and GL options and click on “Save and Next” button.

6. Click on “Create Contact” button if you want to create contact.Then click on Finish button and the Bank account will be created.
Payment Document
1. Select the Account and click on “Manage Payment Documents” button.

2. Click on Create button and enter the Document Name.Then select the Paper Stock Type and Payment Format.Also enter First and Last(Last not mandatory) Document number.
Select Paper Stock Type as Blank Stock for Electronic Payment format and Prenumbered Stock for Paper payment format.

3. Then click apply and the Payment Document will be created.

No comments:
Post a Comment