Download the OBIEE 11g (11.1.1.6.0) from Oracle eDelivery or from the below link:
http://www.oracle.com/technetwork/middleware/bi-enterprise-edition/downloads/bus-intelligence-11g-165436.html
I have downloaded and unzipped all the folder and saved in one folder in my machine D: Drive. From unzipped folder for BI installer, start the installation by double clicking on setup.exe to launch BI11g installer. OBIEE 11g also just like other Oracle products, uses standardized Universal Installer.
If you want to know how to install 'Loopback Adapter' for windows click here
(Note: If you are on win 64 bit OS, run setup.exe from
Drive:<Folder>\bishiphome\Disk1\install\win64\setup.exe)
Oracle Universal Installer will be launched and It will come to the first step screen
Step1: Oracle Universal Installer will start the OBIEE 11g setup screen. Click 'Next' with the below screen
Step2:
In this step we have to select software updates option. If We are
having oracle support id then we can select second option or if you are
having update files in any directory we can go with third option. I have
selected 'Skip Software Updates' and clicked 'Next'
Step3: We
will use Enterprise installation type so that we can take the full
advantage of OBIEE 11g components and the Installer will install and
configure all the required components with default settings. Make sure
to select 'Enterprise Install' and click 'Next' to continue
Step4: 'Next' to continue the installation once the prerequisite is checked wit this screen.
Step5: In this step we are creating New BI System. Select second option if you want the scale out the existing BI System.
User Name: weblogic
User Password: Admin123
Conf Password: Admin123
Give the above credentials in the boxes of below screen and click 'Next' to continue the installation.
Step6: Create
an empty folder in any of the driver where you want to install the BI
System and select that folder with the below screen to create BI System
folder in it.
Step7: Just click 'Next' with the below screen
Step8:
In this step we have to give the details of RCU schemas. Select
appropriate database type and give all other details to go to next
screen. I have installed RCU in Oracle Database. so the detail is like
below:
Database Type: Oracle Database
Connection string: bose-obi:1521:orcl
BIPLATFORM Schema: DEV_BIPLATFORM
BIPLATFORM Password: Admin123
Give the above mentioned details with the below screen and Click 'Next'
Step9: This step is same like above step but we have to give MDS Schema details
Database Type: Oracle Database
Connection string: bose-obi:1521:orcl
BIPLATFORM Schema: DEV_MDS
BIPLATFORM Password: Admin123
Give the above mentioned details with the below screen and Click 'Next'
Step10:
In this step I have installed with my own port numbers which I want to
install with the components of BI because I am having BI 10g in my
system already so to avoid the port number conflict I have chosen second
option 'Specify Ports using Configuration file' and selected the
'Ports.ini' file which I have created in a text file.
If you are installing BI
in your machine first time and donot have any BI system before then
Select first option 'Auto Port configuration' and Click 'Next'
Manual Port Number:
Open the text editor and
copy the below details and save like 'Port.ini' in any folder drive and
select that file if you are choosing Second option with the below
screen:
-----------------------------------------------------------------------------------
#Manual Port Configuration file port.ini details starts
[WEBLOGIC]
#The Domain port no. This is the listen port of Weblogic Adminserver for the domain.
Domain Port No = 6001
#The "content" port for the BIEE apps. This is the Weblogic Managed Server port on which BIEE applications are deployed.
Oracle WLS BIEE Managed Server Port No = 8704
#The SSL port for the Weblogic Managed Server
Oracle WLS BIEE Managed Server SSL Port No = 8804
[OPMN]
#Process Manager Local port no
Oracle Process Manager Local Port No = 6700
#Process Manager Remote port no
Oracle Process Manager Remote Port No = 6701
#Process Manager Request port no
Oracle Process Manager Request Port No = 6702
[BIFOUNDATION]
#The listen port for OracleBIServer component
Oracle BI Server Port No = 8703
#The monitor port for OracleBIServer component
Oracle BI Server Monitor Port No = 8701
#The listen port for OracleBIPresentationServices component
Oracle BI Presentation Services Port No = 8710
#The listen port for OracleBIScheduler component
Oracle BI Scheduler Port No = 8705
#The monitor port for OracleBIScheduler component
Oracle BI Scheduler Monitor Port No = 8708
#The script RPC port for OracleBIScheduler component
Oracle BI Scheduler Script RPC Port No = 8707
#The listen port for OracleBIClusterController component
Oracle BI ClusterController Port No = 8706
#The monitor port for OracleBIClusterController component
Oracle BI ClusterController Monitor Port No = 8700
#The listen port for OracleBIJavaHost component
Oracle BI JavaHost Port No = 8810
#Manual Port Configuration file ports.ini details Ends
----------------------------------------------------------------------------------
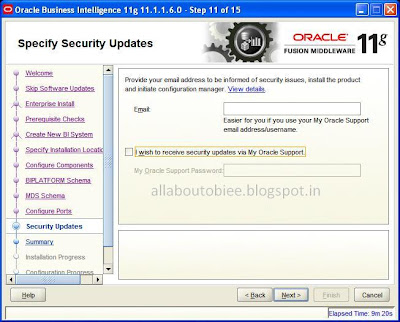
Step11: In
this step It will ask for an email address for security updates. I just
unselected check box from My oracle support so It will give small
screen which will ask for confirmation.
 |
Click 'Yes' with that screen and click 'Next' with below screen
Step12:
This step will give the details of BI system which is going to create.
Click 'Save' Button and save the details in a text file and store it for
future purpose. After that click 'Install with the below Screen.
We will get the following details from saved text file
----------------------------------------------------------------------------------
Type: Enterprise Install - Create New BI System
Installation Details
Middleware Home: C:\OBIEE11g
BI Oracle Home: C:\OBIEE11g\Oracle_BI1
WebLogic Server Home: C:\OBIEE11g\wlserver_10.3
BI Domain Home: C:\OBIEE11g\user_projects\domains\bifoundation_domain
BI Domain Name: bifoundation_domain
Instance Home: C:\OBIEE11g\instances\instance1
Instance Name: instance1
Configure Components
WebLogic Console
http://bose-obi:6001/console
Oracle Enterprise Manager
http://bose-obi:6001/em
Business Intelligence Enterprise Edition
http://bose-obi:8704/analytics
Business Intelligence Publisher
http://bose-obi:8704/xmlpserver
Real-Time Decisions
http://bose-obi:8704/ui
-----------------------------------------------------------------------------------
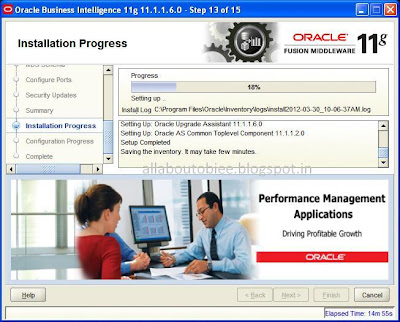
Step13: This step will copy and Install all the necessary files from source folder into BI folder.
Step14:
After the successful installation with the above step It will come to
this step automatically. Click 'Next' with this step after the
configuration is 100% complete.
Step15: After
the successful completion of above step we are coming to final step of
BI 11g installation. Click 'Finish' with the below screen.
Note:
I have installed BI 11g system in my machine with Manual Port configuration. So the port number may vary to open EM, console, Publisher, RTD, and Oracle Answers. So open with default port number if you are installed your BI system with 'Auto Port Configuration'


No comments:
Post a Comment